Sunday, August 23, 2009
08.23.09
Saturday, August 15, 2009
08.15.09 - Etcetera...
The basil took this planter OVER! Note to self - plant fewer varieties of basil - only really liked the Genovese, Sweet Globe, Lemon, and Lime for pesto. The Purple Opal was pretty for bouquets...
This was a gnarly huge turnip that I let grow for much too long. By the time I harvested it, it was woody and dry and grainy. Lesson learned...
There had been a huge bush of yellow pear tomatoes growing on the left hand side of this bed. I found that I didn't really care for their flavor or texture so when the bush slowed production, I pulled it out.
More melons! Yaaaaaaay MELONS!
This was the far tastier variety of cantaloupe. Bummer that I don't remember if I planted it from seed or a start from a nursery. Bummer squared that I don't remember the name of the variety. I'll check my notes, but I'm not holding my breath.
Through the looking glass, er, fence... See that little strip of scalloped cedar edging? I had tried to amend the soil between the fence and that edging with peat and cotton burr compost and agricultural sulphur and other acidifiers so that I could grow some blueberry bushes. See that little smudge of brown, just to the right of the central fence post, about 5 grid sections off the ground? That is a dead leaf, hanging desperately to the twiggy remains of my Tifblue blueberry plant. Oh, the horror! I'll be trying one more time in spring 2010 to do blueberries, but this time I'll container plant them. Fingers crossed.
Stray basils, oregano, mint, and a tigerella 'mater, planted alongside the driveway. I didn't waste space, my friends!!
This was a "stray" yellow pear tomato. I didn't water this plant as much, and the 'maters tended to sun-dry right on the vine. I actually loved eating those! Maybe I'll plant them again in the future and reserve them for drying.
In the center of the back of this path, you can see how my yellow pear cherry tomato bush spread it's wings.
Tidy little dianthus, planted between the fence and the property line. Hey, it's MY property, so I'm going to plant it!!
Eh, same as above. Oh, and you can just see the stakes holding one of my Brazos blackberries, just to the left of the fence post on the right. There's a Navajo blackberry in the corner of the fence, on the far left.
In these shopping bags are the heads of the Giant Amaranthus I grew. I was hoping to shake out the grain and eat it, but maybe I harvested them too late. When I tried shaking them out, I got very, very little - anything. Some seed, some chaff, some twigs, some ants. I need to do more homework on what I'm supposed to do to harvest this grain, and how much I should expect out of two big brushy plant tops. It was fun though! And beautiful! Such a deep red.
See? So pretty!
On the left is my sun gold cherry tomato. Talk about sugar sweet. Those were addictive. They're definitely going to be part of the garden in 2010. I had cut the bush back a bit here because production was slowing down. I had planned to rip the bush out on this day, but just couldn't bring myself to do it. There are a couple of other 'maters along the back of this bed, but neither produced worth mentioning. They were late season varieties and I wonder if they even got pollinated? Not sure. I was noticing fewer bees and butterflies around the garden by this time, and we were in full drought mode.
LOVED having these long stemmed zinnias for cutting. I had bouquets all summer. The purple ones did much better than the chartreuse. In 2010, I'll plant them in the bed between the sidewalk and the street. I want this one for more food production. I'm less worried about people helping themselves to my cutting flowers, so I'll be ok with them in the "sidewalk" bed.
8.15.09 - Continuation...
I managed to get about 15-20 bottles cut and polished last weekend. I used blue duct tape on the polished edges to add another layer of insurance. Even after using the sand paper, those glass rims could cut flesh or wire. Also, some of the bottles had hairline fractures coming off the neck, and I wanted to make sure the bottles would be strong enough to stand up to foot traffic once in the ground.
This is a 12" X 3" auger. It is awesome. Unfortunately, our Texas coliche contributed to the burning out of this drill. Oh well. It was good drill and it had served me well, and it died a very noble death.
A better picture of my handiwork. Might not look like much, but that is most of a Saturday's daylight, sweating in the garage over folding card table and a citronella candle, trying not to hurt myself cutting glass. Humor me.
I wanted to use varying sizes of bottles for the lights. Some clear, some blue, some brown, some green. All with white LEDs. In some places, I wanted to use a single wine bottle or liquor bottle. in others, I had intended to use a cluster of 3 beer bottles. Just wanted to keep it visually interesting.
Just a few more of the bottles. When I was still playing email tag with the landscape lighting specialist, I had promised him these pictures, but as my test continued, I realized the project was DOA.
Yep, more. Just want to be sure you know what I was going for. Since it's not going to happen. Sad face here.
These are all cut-and-taped bottles. You can see in the bottom left corner that I have started to backfill the trench. It looks promising, at least in my eyes...
Finished backfilling and then soaked the soil to make sure it was compacted. Began to notice yet another roadblock - the indentations in the bottoms of the bottles hold silt. Not good if these are supposed to be LIGHTS.
Close up. Keeping the dirt out of those bottles was going to be a B!^@# The difficulty of cutting the bottles hadn't posed itself as an obstacle. After all, I was only going to have to do so many, right? (You'll learn how that hypothesis fell apart shortly). Digging the trench was an issue, but there were other ways to get it done - rent something from somewhere that digs trenches (and the truck with which to haul it home and back), hire someone to do it, suck it up and do it myself. But at this point, seeing how the bottles weren't ideally shaped for the job, I was starting to see that I might have to give up on this one. Having already collected and sorted through over 700 bottles and found the ones I thought to be best suited and been proven wrong was hard to swallow. Not just because I was wrong, but because my sample size was pretty significant, and it told me that finding more bottles that were better wasn't very likely. I might have been able to buy some somewhere, but the point was to RECYCLE, not create a need for a new consumable. Frankly, this made me a little sad.
Starting the trench for the other side. Already exhausted from the first one, and the shadows here say that it was late in the day.
Gah! Forgot to take a picture of the problem that clinched it all for me. At the end of the day, I threw this scrap of plywood over the second trench so no one would break an ankle in it. It kind of fittingly reminds me of a coffin lid, as this trench proved to be the death of the project. The first trench I dug was about 12" deep. And that was about as deep as I could expect to get with just "man power". At that depth, the soil was like rock. However, for the bottles cut for lighting, that was sufficient. In fact, I had to add soil back in for the areas where I was using beer bottles, as they are so much shorter than wine and liquor bottles. But here's the straw that broke the camel's back - the non-light bottles, the ones that weren't to be cut, didn't fit. They were several inches too tall. Duh! So now on top of the trench issue and the silt issue and the electrical work and the logistics of going in at a later date and digging out the top 2-3 inches of soil for the rest of the path to lay pavers and limestone WITHOUT damaging this first stage of the project, I learned that I would have to cut about 700 bottles with the process described in the last post. That's 700. That's what I calculated would be needed to do a 50' line of bottles. Remember, the 15-20 in that bucket at the top of this post was a full day's work.
Saturday, August 8, 2009
Alas, it wasn't meant to be...
So I had this awesome, totally inspired plan for lighting the main pathway to the garden. The one going from the front gate to the front door. It was going to involve inverting empty beer and wine bottles and burying them in the ground, in a straight line on either side of the path. Every 5 feet or so, the bottles would have LEDs in them, and they would act as running lights to light the way at night.
I had been toying with this idea from well near the inception of the whole front yard project, and I was pretty attached to it. Sadly, in the end, it wasn't to be. I couldn't find LEDs that would fit the project (which is not to say that they don't exist - just with my limited electrical knowledge, I couldn't dig them up). I also didn't really want to expand my DIY realm into my home electrical system. The project would require not only installing the LEDs into the bottles, but also connecting the LED power source to the same wiring that powers my porch light. I tried to involve a landscape lighting specialist but we never seemed to get our conversations off the ground.
I finally decided that I needed to at least do some testing of the process to figure out whether or not to continue to pursue the project or to just let it die a dignified death. As previously stated, I ended up having to let it go, but in the interest of sharing the DIY-Love, here is the process I followed. Maybe somebody will be inspired and will be able to make this work in their own project...
So, to prepare the bottles, the ones that were to house wiring and LEDs would need to have much wider openings than the standard beer or wine bottle. That meant I had to figure out a way to cut the necks off the bottles. After studying some HGTV segments and some online ads for bottle cutting gadgets, here's the process I came up with:
Wearing heavy leather gloves and glasses, I used a glass cutter to scribe the straightest line possible around the neck of a bottle. It worked best when I didn't make any "double cuts". Just one time around, and good luck making the ends meet. The towel helped stabilize the bottle as I turned it to scribe the line.
After the line was cut, heat was applied to stress the glass and encourage the break to follow the line I had scribed. I tried several little torches, but in the end, a cheap citronella candle was the most reliable heat source. (Yep, a little discontinuity here with the bottle. Oh well.)
I had to do a little experimentation to figure out how long to heat the cut. As it turned out, the longer I could stand to heat it, the more likely it was to break cleanly for me. Go figure! It was hard to be patient though, because I was just so excited!!After heating, I immediately submerged the bottle into a tub of ice water. The glass cutting tool had a heavy ball-bearing on one end, and I used that to tap around the cut to encourage the break. This bottle took some tapping. Others that I had heated for longer didn't. They would just make this really cool, "tink tink, woosh" sound as the glass cracked and the water rushed and the neck fell away from the bottle.
This one gave a pretty nice, clean edge. The next step was to put the cut end of the bottle on a piece of sandpaper that was laying on my work table and spin it until the edge was smoothed out. Forgot to take a picture of that.
This is the same bottle from the very first picture. I had heated this one more, and it didn't need any tapping when it was in the ice bath. It just made that cool noise and broke clean.
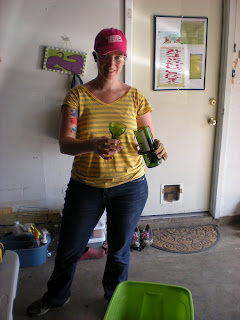