4.24.09 - 4.26.09
Playing catch up...again! Hmmm...let's see. On the 24th, it seems from the pictures that I had picked up my first package of red wigglers for the worm bin. It's a really cool little composting/vermiculture bin - it's the green contraption in the pictures. I'm writing this post in mid-June and that little box of worms ate most of my kitchen scraps from the day I put them in their bedding through early June, when I had to temporarily stop feeding them so I could harvest the castings. In just 4 weeks, they gave me about half of a 5-gallon bucket of castings. AWESOME! Now (mid-June) I've started feeding them again and will harvest more castings in a few more weeks.
yep...that says "worms"
the bin is set up with moistened shredded mail, the cardboard label from the bin, a little bit of soil (those of my seedlings from earlier in the year that didn't make it, made it into the worm bin)...then I dumped the wormies in!

then I dumped in the soil from the box the wormies came in... after that, I tore up the box they came in and threw that in, too.
Yay, Vermiculture!!
in theory, worms are high in protein, low in fat, and highly nutritious - in reality, they're slimy and icky, and NO, I didn't eat it!!
after I set up the worm bin, I changed clothes and tried to finish the soaker hose-to hose-to soaker hose connection project. I this point I had been to HD 3 or 4 times to get the parts I needed. The last time I went, I actually took in the 75 foot soaker and all the other parts and threatened to lay them out end to end if I couldn't once and for all get the parts I needed. It seemed to work, but I wouldn't know for sure until later the next day, when I finished the project.
The 25th must have been a Saturday. To finish running the soaker hose across the front bed, I first had to pull out the pavers I had (temporarily) placed previously.
laid them out exactly as they had been placed, and would need to be re-placed...
starting at the end of the bed furthest away from the driveway, I wound the soaker through and around the plants I had put in, staking it as I went.
I created attached the soaker end to the left side of a "y" connector, and connected a short length of regular garden hose to the right side. This section of hose is going to end up going under the pavers, then will be connected up to another length of soaker to water the shorter side of the flower bed.
I threaded the garden hose segment through a length of PVC to keep it from being squashed by the pavers.
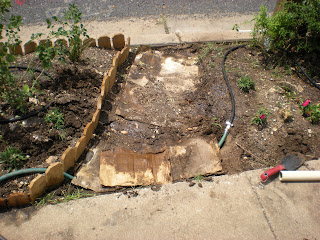
the cardboard (two layers) is to help control the weeds and unwanted grasses...

putting the pavers back in...
 very paver-y!

adding the mulch...
 almost finished with the mulch!
On Sunday the 26th, I finished tweaking the project. I seeded the soil "grout" around the pavers with creeping jenny plugs to both hold the pavers in, and keep weeds at bay. I think I also did more planting...Like I said, it's June now and it's hard to remember the order in which things got done...
 very paver-y and mulchy!
 I also finished planting the front bed. These plants are all either nomads from the backyard, or half-dead clearance plants from my favorite clearance plant hook-up.
let's see, there are a bunch of zinnias (pink and orange) a pink rock rose, electric blue salvias, dianthus of all shades...
 I started putting in the cedar edging, and planted this bed similarly to the front bed. At the far left in this picture, there are two cantaloupe plants. Surely the 10-ish feet to the end of the driveway, and the 6-ish feet from the driveway to the blue fence will be enough space for a couple of cantaloupes to grow...
 surely a couple of little ol' cantaloupe plants wouldn't need MORE room than this. That's almost half the bed!!


