Sunday, December 20, 2009

12.20.09

Playing catch up on the blog. It’s late January, 2010, and I’m filling in captions and notes for draft entries for months past. Cheers!


We did a white elephant gift exchange at the office where we were to spend no more than $10.00. So of course I would use this as a perfect opportunity to share my love of gardening! A few winter veggie starts from The Great Outdoors did the trick. I got a plastic bin at the dollar store, drilled drainage holes, lined it in cardboard, filled it with soil, and poked the plants in. I also typed up some "how to" notes. It was so fun to put together. I'm not 100% sure that the recipient was as thrilled as I was, but what can you do?


Let's see...curly endive, raddichio, firecracker lettuce, mibuna, another lettuce, and another veggie - can't remember what.


Monday, December 7, 2009

12.7.09

Playing catch up on the blog. It’s late January, 2010, and I’m filling in captions and notes for draft entries for months past. Cheers!


This is a big ol' turnip that I dug up. I grew them in the summer, but I left them in the ground too long and they became fibrous and woody. Not good for eating. Unless you're a worm. I fed my summer turnips to the worm bin.

Big ol' mess of turnip greens. Hadn't ever fixed them before so I was up for the experience.


Buncha herbs I picked to play with. Looks like thyme and some mint and some oregano.


I made turnip and red potato hash browns. I found a recipe online for potato hash browns and tweaked it a bit. Luckily, some online reading before this culinary experiment informed me that turnips hold a lot more water than 'taters, and would need to be pressed to expel water to help the hash patties hold together.


So nicely browned. They tasted a lot like potato hash browns, but with a slightly astringent flavor. Sort of bright and crisp. Different. I think the experiment was a success.


Here's my recipe:
  • 2 medium turnips, cleaned and shredded (reserve greens for another dish)
  • 2 medium red potatoes, cleaned and shredded
  • 1 small radish (optional – this one was a “volunteer” in the yard and thusly made it into the mix)
  • 4 oz shredded parmesan
  • Olive oil: 2T for root veg mix, plus extra for the pan
  • Garden herbs (or dried) to taste
  • S & P to taste
  1. To remove excess water from the potatoes and turnips, I put the shredded root veg mix by the handful into a clean cloth napkin and squeezed as mightily as I could. (Saved the run-off for the worm bin)
  2. After squeezing out as much water as I could, I mixed in a handful of chopped herbs (onion leaves, oregano, sage, and thyme) and peppered the mix liberally. Drizzled in the olive oil. Tossed by hand.
  3. Next I threw in about 4 oz of shredded parmesan. Real stuff, not the salty powder that comes in the green cylindrical can. Tossed one final time.
  4. Heated a non-stick pan over med-high heat and drizzled in a little olive oil for extra stick-protection.
  5. Added two mounds of the mix, shaping and flattening to about ½ inch as quickly as I could.
  6. Had to keep playing with the heat – too low and the cheese would melt and bind but the veg wouldn’t cook all the way through; higher heat to help the patty cook better but sometimes blackened the cheese. Med-high is best, but you may have to play with it some.
  7. To achieve a nice texture to the turnips and ‘taters and a crispy, golden brown from the cheese, cook 2-4 minutes on each side. Gently lift a corner of the patty with your spatula if you’re unsure. Try to flip only once, but if you turn one prematurely, don’t be afraid to flip it back over. I found that the resulting cake stayed together fairly well – certainly well enough to transfer to paper towels to drain, then to plate. They weren’t quite as crispy as a traditional potato hashbrown patty, but still a pretty fair approximation, given that this was my first attempt. I liked the flavor – sort of spicy but still familiar. Served it with sautéed mixed winter greens (kale, chard, and turnip) with onions and mushrooms.


Sunday, December 6, 2009

12.06.09

Playing catch up on the blog. It’s late January, 2010, and I’m filling in captions and notes for draft entries for months past. Cheers!


This was the "Caprese" bed. Now it's chock-a-block full of brassicas and other cold-loving veggies. The yellow plant spikes are the markers from The Great Outdoors. They have a ton of info on them, so when I made the metal plant spikes, I made sure to punch a hole in the bottoms of the yellow plastic stakes and thread them onto the hanger wire along with the metal tag. If I were TRULY efficient, I would have taken the yellow tags into the house and put them in my planting binder so the info would be at my fingertips, but I live in a state of barely managed chaos, and that's getting a little advanced!!


This is an artichoke plant (in the dead center of this box). It's supposed to over-winter well, then become a big, three- or four-foot by same bush by summer-ish, with the artichokes growing on stalks throughout. The other plants around it are rudibeckias (sp?). If they make it through the winter, they'll be moved to the "sidewalk" bed so the artichoke doesn't overtake them.


Brassica bed with metal stakes and the yellow info markers. One of my brassica beds was mostly grown from seed, and the other was mostly planted with starters from my favorite nursery, The Great Outdoors.


I think it's so cute, with all of those little tags standing sentry over the baby plantlets!!


The color of that firecracker lettuce is to die for!


It's fun to make these plant tags because precision is NOT the idea. I love the imperfection of them!


"FIRECRACKER LETTUCE"


"ENDIVE"

Which I found out, wasn't. Apparently TRUE endive refers to those little blanched football shaped heads of succulent crispiness, and requires a multi-faceted approach to growing. I will, of course, be doing this, but not this year. It'll have to wait until after ALL of my hardscaping is finally completed.


I forget the story on this little radish. I think it was a volunteer that just appeared in the middle of the yard. That's pro'lly it.

Saturday, December 5, 2009

12.05.09

Playing catch up on the blog. It’s late January, 2010, and I’m filling in captions and notes for draft entries for months past. Cheers!


We had a nasty, early freeze. I didn't get all of my plants covered in time. I had fully planned to, and then failed. These following images include plant carnage, and may not be suitable for all viewers. Discretion is advised.


Froze globe basil...


Froze zinnias...


Rags thrown over squash and gourds, to no avail. Insert sad face here.
Oh, the carnage. So, so, SOOO sad.

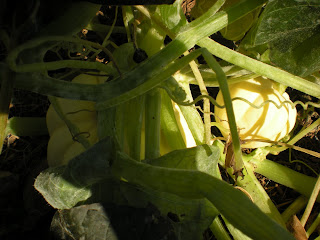
I found half a dozen or so pumpkins and acorn squash as I sifted through the freeze-damaged vines.

Acorn squash...

Some white mini pumpkins...

I took all of my pumpkins and squash to Houston for Thanksgiving and we used them for centerpieces. Once back home in Austin, I let them ripen more in the kitchen. Eventually they got carved, seeded, roasted and pureed and made into some awesome muffins.

This was my sun-gold cherry tomato bush. Man, those things were delicious. I hated seeing this thing die.

Yep, you guessed it! This is THE bed. Since it's somehow finding its way into every post, I'm going to start hiding weird things in it. The first person who posts a comment to the blog identifying that week's hidden object by the deadline (I'll put it in the post) will win a handful of what ever is in season!

My "Jack-O-Lantern" vine, decimated. But the pumpkin didn't die!

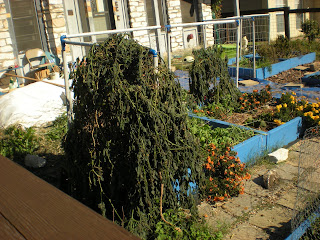
Thank goodness for cold weather veggies! My brassicas did great.

As did most of my herbs.

My "Caprese" bed didn't fare as well, but I wasn't thinking it would. I needed the freeze damage to encourage me to clean out the bolted basils and the hopeless 'maters and peppers and put in something that would do better in the cold.

The wilted marigolds were heartbreaking. What was a firey mound of orange and yellow just a few days before turned into a sad puddle of deadness.

I had tried to use these army green frost covers, but they weren't all that helpful. I thought these covers were supposed to insulate, not just keep frost from touching plants. Apparently, I misunderstood the packaging.


Blobby frost cover messiness.


More of same.


I'm sure you get the picture, but I'm still not going to edit!


Guess!


I do have a point here eventually... wait for it.


Ahhhhh, yesss! My PVC biodomes! Just some cheap electrical (or plumbing - now I can't remember) pipe, some nuts and bolts and VOILA! After experimenting with the pole length and finding what would cross from corner to corner without flipping out of place or creating a huge amount of space between the tallest plant and the frame, I cut all of the poles to length. Ten beds, two poles per bed. I think the measurement I used was 7'. I bolted two poles together making sure the nut was on the bottom of the "X" when installed so as not to rip my frost cover.

I thought I was going to have to use bracing hardware to keep the frames in place, but they are actually VERY snugly installed with just the tension of the PVC against the wood. Easy-peasey to pop in or take out as needed.

Draping blankets over the frames prevents crushing delicate plants, as well as forms a pocket of insulating air in the center.


I was VERY happy with these. My original plan was to use them to hold up the green frost cloth for future cold snaps, and if necessary, layer warmer blankets on top. I eventually found a better product though, and the green frost covers got relegated to the back yard plants. Pics of and info on the better product to come.