

damn, but these bags are HEAVY!

after we leveled them and made sure they were in line with David's "string trick", we screwed scrap wood to the fronts to keep them in place while the concrete cured...


after i tacked the boards in whilst Trent held them up, Trent went back in and put in the rest of the screws so i could go back to planting. what a sweetie.
When not priming or painting or installing lumber, I was busy planting my boxes. I started with the two deep ones on the right side of the yard (if looking at the house from the sidewalk). These boxes are deeper for root veggies and things that need deeper root systems, like tomatoes and peppers. They also have vertical supports with netting along the back and the left side. I'll train the 'maters, peppers, cukes, and melons up this netting as they grow.
This weekend (3.14 and 3.15) consisted of painting the lumber for the second panel, and planting more boxes. My civic holds EXACTLY enough lumber for one panel at a time, so I'll buy the last of it this coming week and we'll finish painting and installing this coming weekend. AWESOME!
 two panels installed, one to go!
Once the blue fence is finished, I'll be able to dole out the plants from the backyard that are desperately in need of more sun. I already have a rose bush planted alongside the new fence. It was a volunteer from the flowerbed under our living room windows. I had to rip that rose out, and there were about half a dozen volunteers in addition to the original root ball. AMAZING what nature can do. I gave most of them away, and just kept the healthiest volunteer. That got transplanted to the blue fence area. I have 2 other roses that are going to be moved up front, as well as a lot of random sun-loving plants. Jasmine, a rock rose that's been struggling for years, some grasses, lantana, two fading xioras (sp?). Mom's started some bleeding hearts for me that are going to look STUNNING growing up that blue fence. I'm also reserving the lowest portion of the area for yellow watermelons. It's the perfect spot for them! Any other sun bathers that need to be moved from the back yard will go in the strip of land between the sidewalk and the street. It's a no-man's land, owned by the city, but I don't want to mow it anymore, so it got de-sodded with the rest back in November. The plants that will go there are mostly my clearance "Lazarus plants". The plants all look AWESOME now, but I paid pennies for them. So, if the city has to rip them up to address a gas line issue, all will not be lost.

look carefully in the center bottom of this pic and you can see the "volunteer rosebush" all planted and in shock. yay, shock!
Planting boxes involves mixing soil. The soil mixture recommended by the literature I read (Square Foot Gardening by Mel Bartholomew) is not pre-bagged, store-bought stuff. Oh no, that would be too easy. And economical. No, I decided to drink the SFG Koolaid full heartedly and make "Mel's Mix" for all of my boxes. One batch (which fills 2.5 shallow boxes, or 1.5 deep boxes) includes 4-6 bags of different kinds of mature compost, 1 big brick of sphagnum moss, and 2 ginormous bags of vermiculite. The idea is to mix a moisture-retaining but well-draining, nutrient-rich mixture that isn't so rich that it'll burn sensitive new plants. It's no small effort mixing this stuff up, but it's well worth it. So far anyway. I mix it on a tarp near the intended beds, then shovel it in. Once filled, I plant, mark, mulch, and water.
The first set of deep boxes is now 100% planted. I had left some spots unplanted the first time I worked it so as to stagger the harvests. Now those are all filled in, as is the first of the shorter boxes to be filled with soil. I actually added the soil to two of the shorter ones, and planted one and a half of those. Then I added the soil the second set of deeper beds, which also have the netting for climbing plants. Can't freakin' wait for all those goodies to ripen!

mixing soil...not the funnest thing to do...
 boxes filled with soil, now planting!
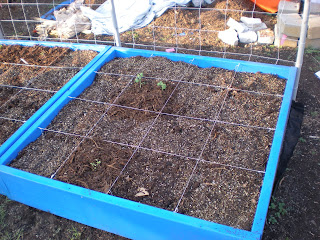
ditto!

wish i could say i grew that gorgous chard from seed, but i did not.

planted, labelled, and mulched
The shallower box that I completely filled today is planted mostly with the seedlings I labored over in my kitchen all these nights. There are two swiss chard plants and over a dozen strawberries that I bought at nurseries, but the rest were all hatched at home! I have chard, spinach, garlic, thyme, sage, dill, a billion kinds of basil, arugula, spicy mesclun, sweet mesclun, nasturtiums, and about a elebenty-seben kinds of mint (pineapple mint, orange mint, sweet pear mint, chocolate mint, apple mint, pennyroyal, catnip, candymint, spearmint...a couple more).

this is the more recently filled of the two sets of deeper boxes. netting installed and planting started.
 my honey, waitin' for me to come sit down with him and have a beer. yay, beer!

little fuzzy, but that smudge of red in the middle of the smudgy green is the first bud on my from-seed marigolds

buds (above) and blooms (below) on my Brazos blackberry canes. probably won't get fruit this year, but next year for sure.

I also spent some time in these last several weeks working on the weird little flower bed under the living room windows. It's always presented sort of a challenge. At one point, I had extended it out into the lawn, but then the grass got back in and blahdiddity blah blah. It's always been sort of a hassle. Some straggly rose bushes of nondescript red fought with very determined weeds for space, food, and light. I almost NEVER watered it. I liked having something thorny under these windows as a deterrant to intruders, but this little nook never really worked for me. I knew I had to rework it, but I wasn't sure just what to do with it.
Once I pulled out the rose bushes, the plan became clear! The space won't be replanted until after we paint the house later this year. In the meantime, I'm building a very low retaining wall (just two retaining bricks tall) to define the bed. It's just going to be a straight line as defined by the existing parameters of the house. I'll dig out most of the soil, lay abundant weedcloth, and fill with a "succulent-friendly" mix. I'll put one of those giant agaves in, and surround it with other smaller succulents. My lovely SIL's grandfather gave me a gorgeous aloe (or maybe it's a smaller agave?) that will find its "forever home" right here! The agave will be imposing enough to deter intruders, but if we have to exit through a window for a fire or something dramatic like that, it won't be as bad as exiting through rose bushes or a prickly pear. The area gets a ton of sun, though it will be filtered once the 'maters and stuff are growing up the netting in the grow-box directly in front of this bed. I still think it'll be plenty sunny enough for the agaves. And I won't worry too much about whether the variety we get "pups" or not, as the area it's growing in will be very enclosed. I think it'll be gorgeous! No pics yet. Just have an ugly little trench where the retaining stones will eventually go.
Ok kids, I think that's a wrap!
smooches,
E
Oh wow! Your gardens are really coming together now. It won't be long...
ReplyDeleteI told one of my "hippie, organic-loving, veggiehead, yogi" coworkers about your self-sustaining, squarefoot garden project and she absolutely loved the idea. I told her if she ever came to Austin, I'd show her your yard. =)